
DIY Campervan Conversion Guide: Your Home on Wheels
Transform your campervan into a cozy home on wheels with our comprehensive DIY campervan conversion guide. Get step-by-step instructions and all the essential information you need for a successful conversion.
DIY VANBUILD
7/10/202527 min read
Introduction:
Have you always dreamed of building your own van? The freedom of the open road, the ability to travel wherever you desire, and the comfort of having your personal space on wheels are just a few of the exiting aspects of campervan living.
In this blog post, we delve into the exciting journey of DIY campervan conversion. Whether you're a seasoned DIY enthusiast or a curious beginner, we'll guide you through the essential steps, creative tips, and practical considerations to help you transform a standard van into your dream home on the road. Join us as we break down the process, share valuable insights, and inspire you to embark on your very own van life adventure!
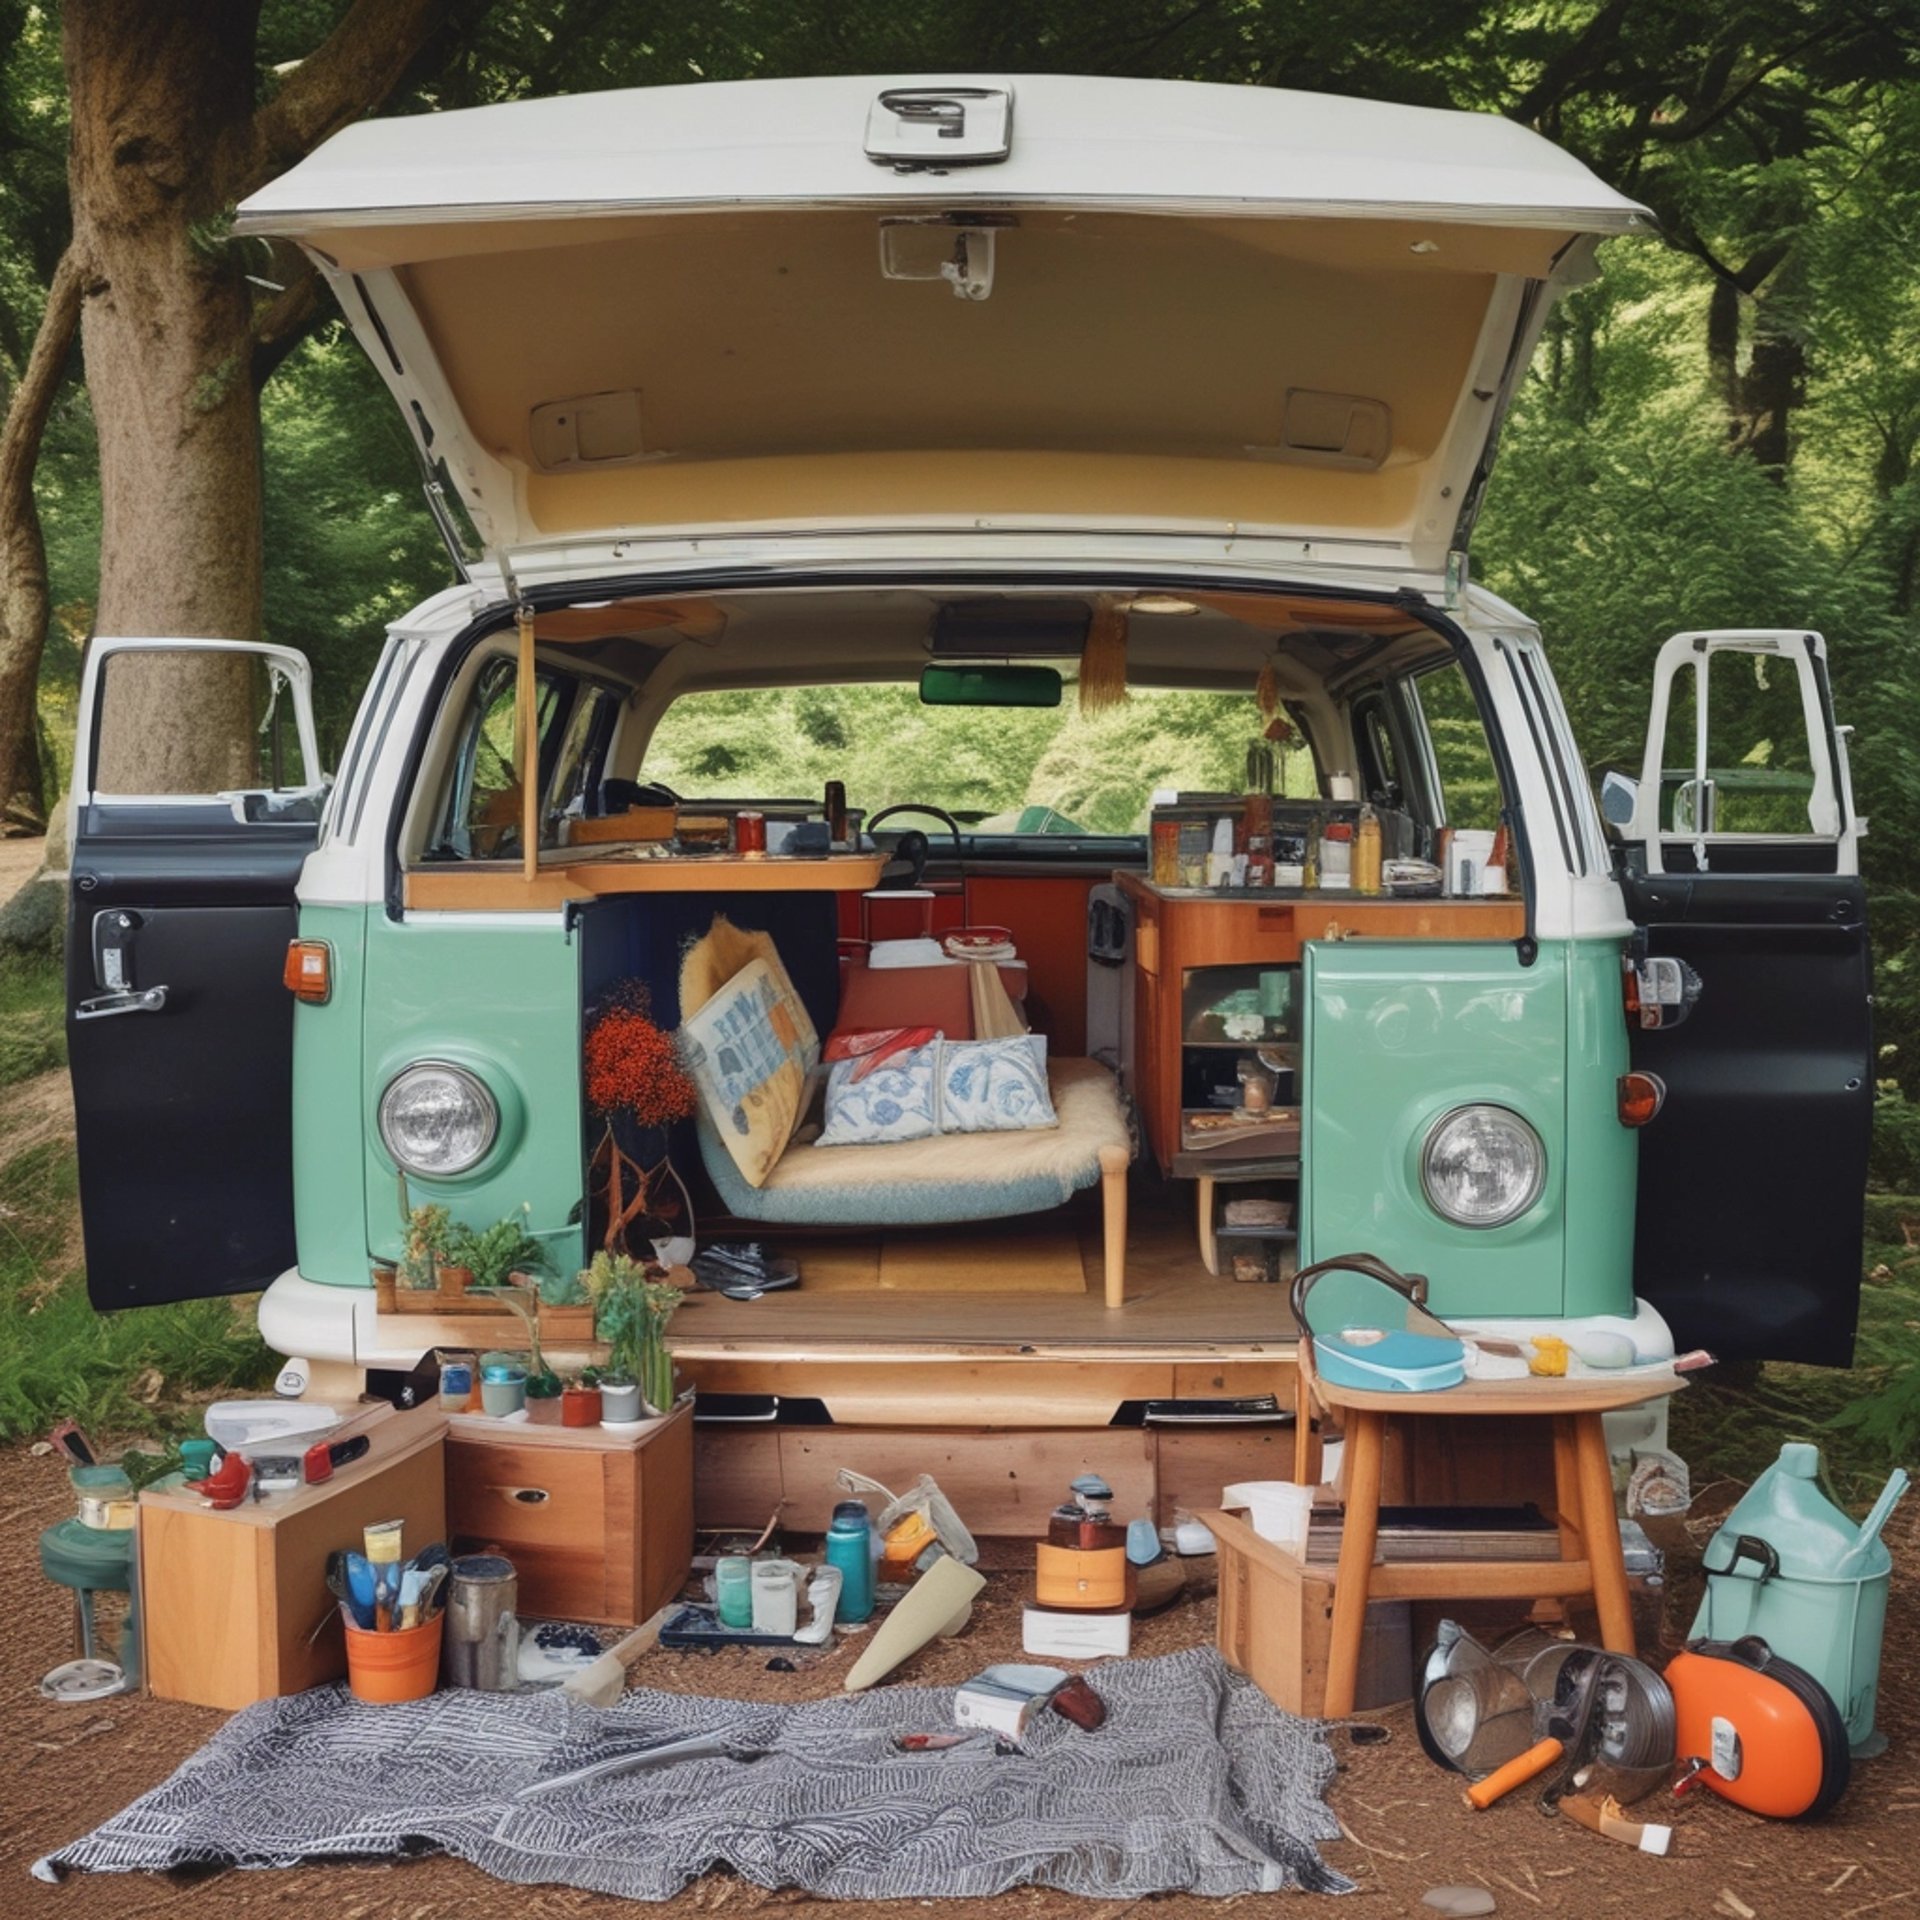
Converting a Van into your own little home on wheels is quiet a project, you can do it as an abolsute beginning but be prepared for it to be expensive and you will require a lot of tools.
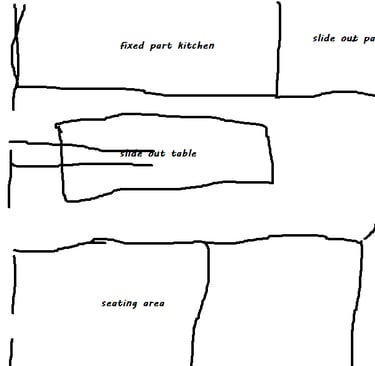
Our Layout
Before you start building your van, you need to think of a layout. We will give you our layout as an example, but this is fitted to our wants and needs, so you are advised to make your own decision and create a layout customized to you.
When you think of a layout, there are important questions you need to ask yourself.
Here are some examples:
Medium, Long, or Short wheelbase vehicle - This determines how much space you have and therefore what or how much you are able to fit in.
High Roof Van? - Do you want to be able to stand in your van, or is that feature not necessary?
What are your needs for the van? - Do you want it to be self-contained or not?
Do you need a shower? - Indoor or outdoor one?
Kitchen? If you want one, how detailed should it be? Is it a basic slide-out kind of setup at the end or the side of the van, or do you want a proper working space inside?
Powerpoints - How many do you need? Is one next to the bed enough, or do you need another one in the kitchen?
Power - From where do you generate power? Are you going to rely on powered campsites, or do you use solar panels to power batteries?
Batteries - Where do you store them?
Bed - Do you want a slide-out bed or a fixed bed?
Seating area - Where would the seating area be if you require one?
Storage space - Where and how much storage space do you want?
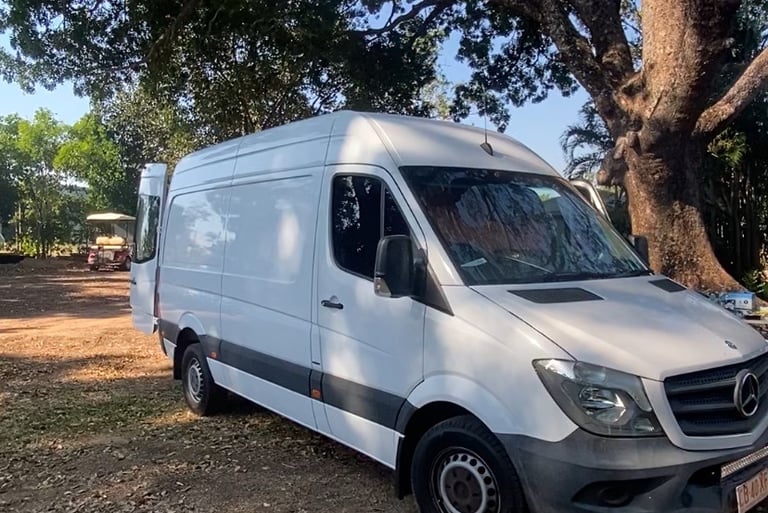
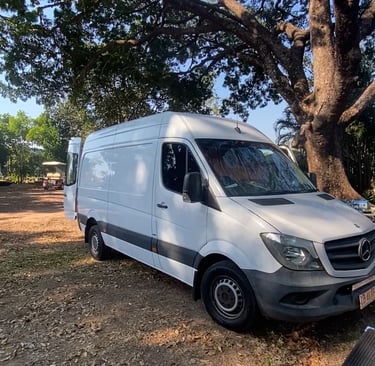
We settled on a high roof Mercedes Sprinter van, medium wheelbase. One of our main criteria was to be able to stand upright in the van. We also decided on being fully self-contained. Since we only have a medium wheelbase, we needed to think of a solution to gain some space.

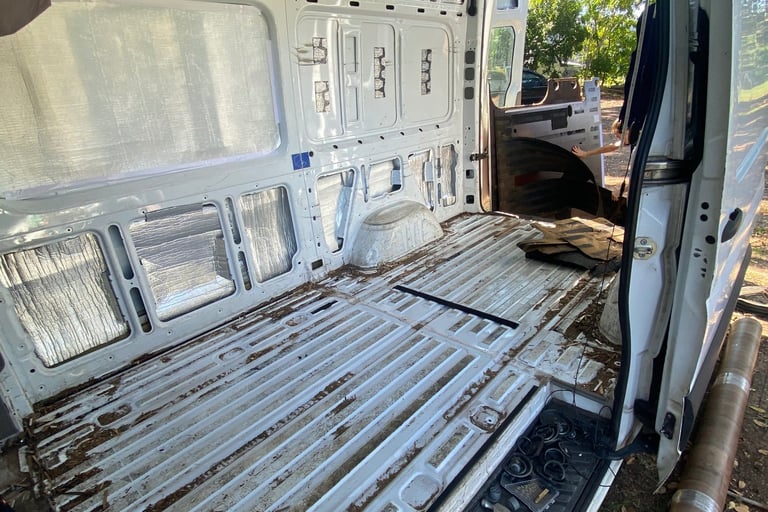
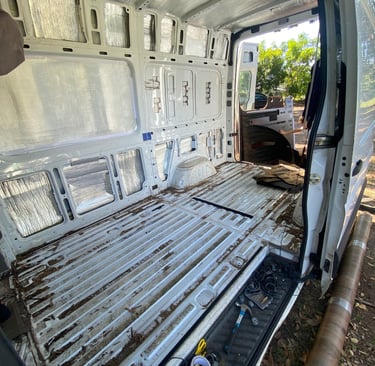
Step 1: Stripping the Van
Stripping the van is a pretty much boring task, but nevertheless it is not less important. For us, the stripping included the following:
We took out the wall dividing the driver cabin and back compartment (this is optional, but we decided on it simply to have easier access, and it also gave us a tiny little bit more space).
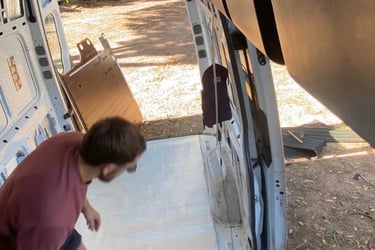
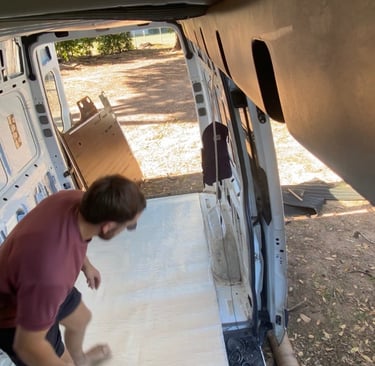
We took out the wooden floor in the van. This was necessary since we wanted to be able to insulate the floor underneath. It was just screwed down, so it was easy to take out.
Keep in mind that this step can involve some more work; for example, if your van was used as a commercial vehicle before and has cupboards or boards installed.
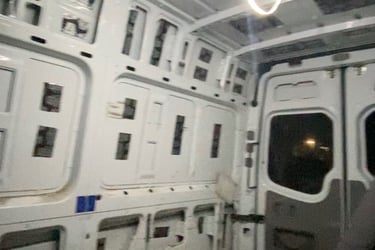
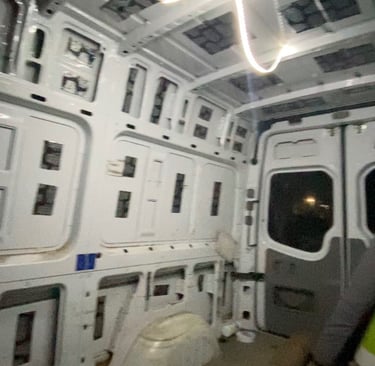
Step 2 Sound deadening and Insulation
Materials:
Sound deadening matts
Insulation of choice
Tools needed:
scissors or cutter
tape
Step 1: Clean the inner walls you want to sound deadening:
To make the sound deadening to be effective give your inner walls and ceiling a quick wash so that the sound deadener sticks better.
Step 2: Sound Deadening
We used The Sound Deadener which we bought from Repco. The package included 12 sheets, which were enough for our Van, even though it was really tight. Always remember the more the better. We used regulary scissors to cut in pieces suitable for our surface. It is easy to install, once cutted to your satisfaction just peel of the foil side and stick it to the surface you want it to be and it will stick to it.
When we were done with this we could already tell a difference between the wall we coverd and the sliding door which we left out, since we later wanted to cut out a window, to gain some extra sunlight.
Step 3: Isulation
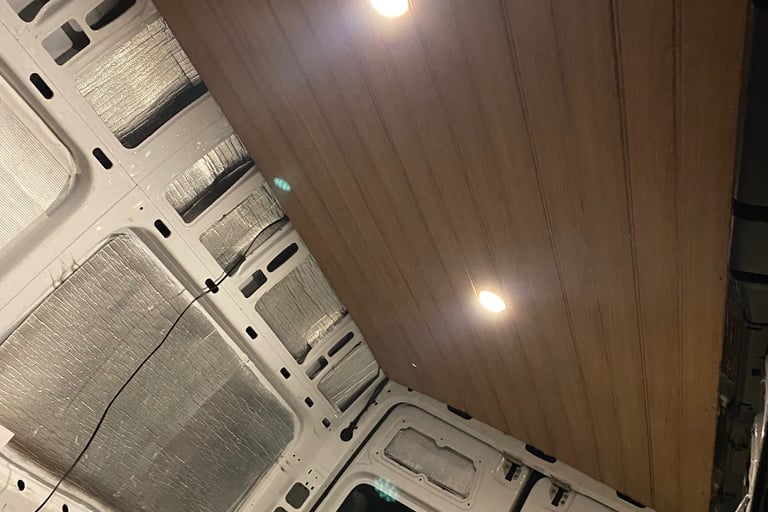
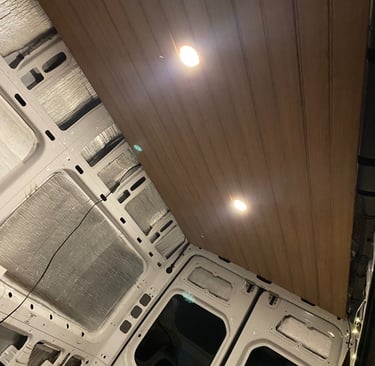
If people tell you, you can skip that step if you only pan to stay in warm places or something like that. Don´t! Isulation is a crucial step, which you shouldn´t skip. It helps to keep the cool out, but also to keep the heat out.
For the Isulation we decided to go with Bunnings Isultion Liner. We bought 2 Rolls 1 which we intended to use for the floor and the other one for the ceiling and walls, we ended up using almost everything of it and the rest we used to make a cover for the backwindow which we sealed with Velcro Fastener so that we can tae it off during the day or while driving.
Isulating the Walls:
For this step i would recommend using a big sheet of paper or something similar and lay it onto the van to draw your sturcture on it and then you can simply cut it out, place it onto the isolation liner and cut it out. To glue it onto the wall we used the recommended double sided tape from the same brand as the liner itself.
Isulating the Ceiling:
We did the same as what we did with the walls and cut our templates out of paper and placed it onto the liner.
Isulating the Floor:
This one was the easiest we took and entire rool and simply rolled it onto the floor after puuting tape on it. It fitted perfectly widewise, we just needed to cut out the wheel archs.
After that we decided to put the wooden floor liner which was originally in the van back into it. We simply put it back onto the isolation and decided to put our floor directly onto it.
This step was relatively easy and boring, and we easyly did it in one relaxed afternoon.
Step 3 Flooring
Options to Consider When building a campervan, one of the most important choices you’ll make is your flooring. The right flooring not only enhances the aesthetic appeal of your space but also serves functional purposes such as durability, comfort, and ease of maintenance.
1. Vinyl Flooring Vinyl flooring is one of the most popular choices for campervans, and for good reason. It is waterproof, easy to clean, and provides a durable surface that can withstand the rigors of life on the road. Available in a wide variety of styles and colors, vinyl can mimic the appearance of wood, stone, or tile, allowing you to achieve your desired aesthetic. Pros: - Water-resistant and easy to clean - Lightweight and flexible - Affordable and available in many designs Cons: - Can be less durable compared to other hard surfaces - May fade over time with prolonged exposure to sunlight
2. Laminate Flooring If you’re looking for a more upscale feel, laminate flooring could be an excellent choice. Laminate is constructed from multiple layers that create a sturdy surface with a beautiful finish. It's resistant to scratches and stains, making it a suitable option for a campervan environment. Pros: - Aesthetically pleasing, with many wood and tile styles available - Durable and resistant to wear and tear - Easy to install as a floating floor Cons: - Not waterproof, so spills should be cleaned quickly - Can be slippery, depending on the finish
6. Wood Flooring If you want to add a touch of elegance to your campervan, wood flooring is a timeless choice. Hardwoods or engineered wood can provide a very luxurious finish, and natural wood has the advantage of being inherently durable and warm. Pros: - Attractive and timeless look - Highly durable, especially with proper care - Can add value to your campervan conversion Cons: - Can warp or be damaged by moisture - Requires more maintenance and sealing than other materials
Conclusion:
Choosing the right flooring for your campervan is essential for both functionality and style. Each option comes with its own set of advantages and challenges. Consider the type of adventures you plan to undertake, your budget, and how much maintenance you’re willing to commit to when deciding on flooring. No matter which material you choose, ensure it aligns with your lifestyle and enhances your overall campervan experience. With thoughtful planning, you’ll create a warm and inviting space that feels like home—no matter where the road takes you. Note: There are more options out there, these where just the basic and most common ones.
Our Choice:
We decided to go with vinyl. Our main reasons for choosing this were the following: it is water-resistant, easy to clean, and lightweight. When choosing vinyl, we had another decision to make: Vinyl Planks, Tile Flooring, or Vinyl Sheet Flooring. At least this was an easy choice: Sheet Flooring. Why? Simple—because it was the easiest to install.
Step 1: Measuring
First, you need to measure your floor. We measured both the length and width.
Step 2: Settle on a Floor
In our case, we went to Bunnings again and looked at the options for Vinyl Sheet Flooring. When we previously discussed what colors we wanted in our van, we planned to keep the walls white and have some brownish, wood-like colors in the ceiling and floor. To our relief, we found a floor that we both liked and that seemed suitable for our plans. The only downside was that the floor was much too wide for what we needed., we decided to still go with it.
Step 3: Install Your Floor
In our case, our floor didn’t need to be glued or anything - we could just easily lay it out. So, we simply rolled it out and cut around the edges. At the end of the van, we were lucky enough to be able to cut it and put it under the edge strip, then screw that back on. On the side door, we bought a baseboard to get a clean finish.
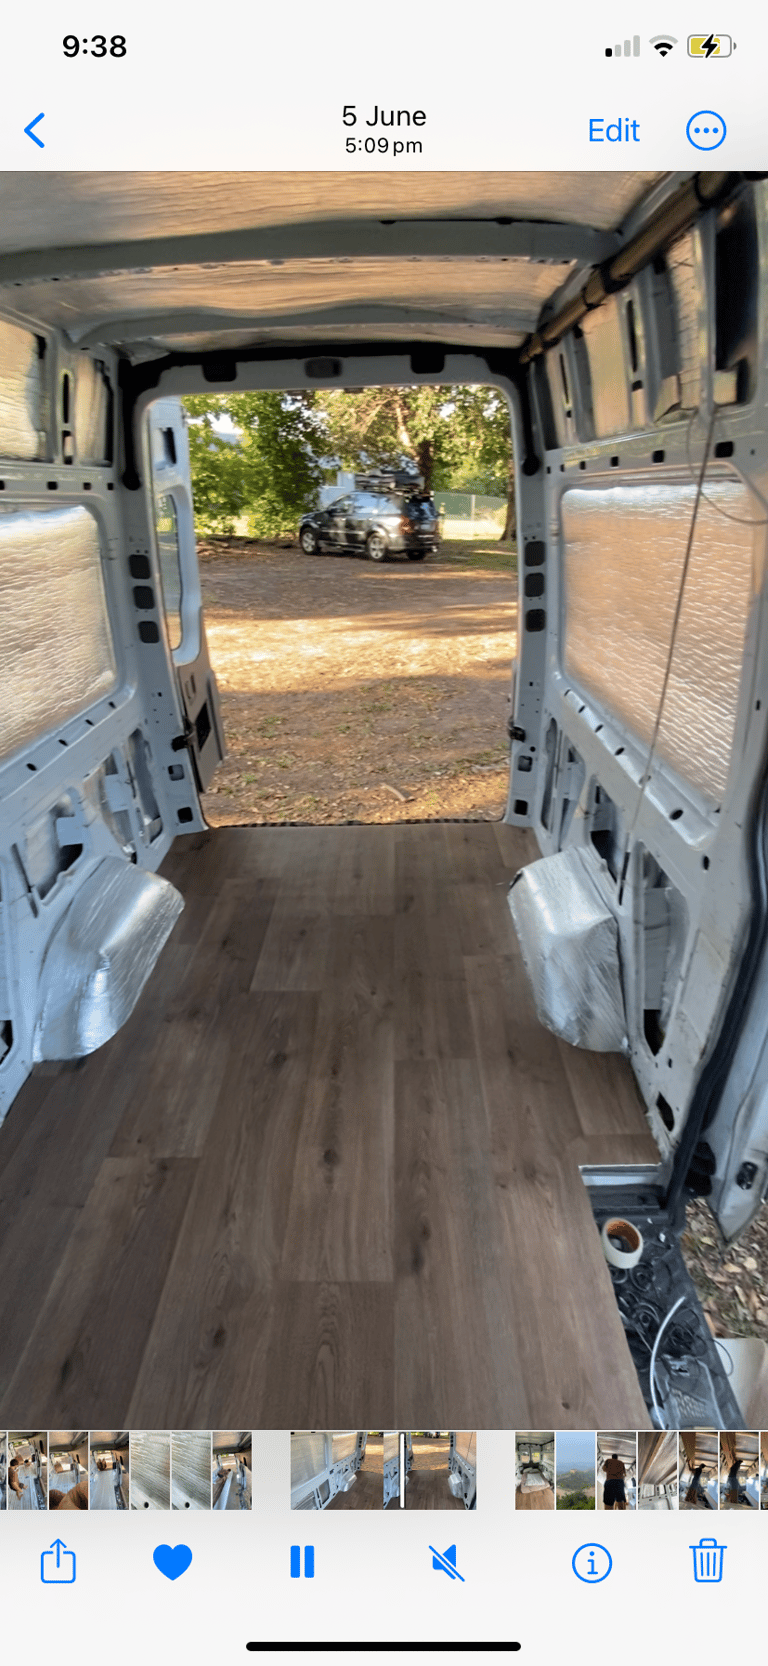
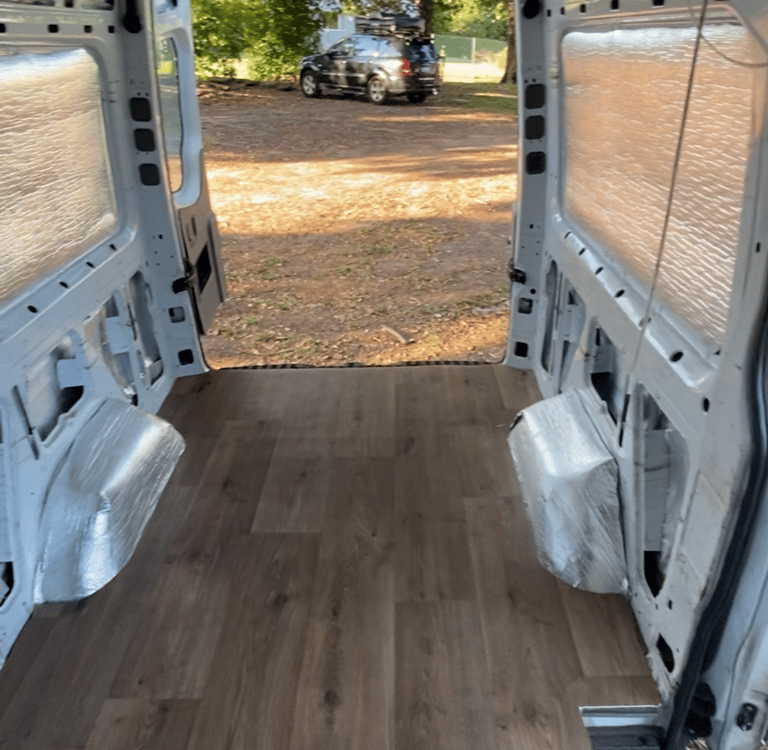
Our finished Vinyl Sheet Floor
Step 4 Ceiling
Materials:
Roof Vent
Window sealer glue
Step 1: Install your Roof Vent
First you have to make the choice of the location of the Vent. We had the option of having it somewhere in the kitchen area or in the bathroom. Both locations are reasonable but we decided to go with the shower, since our kitchen would be located next to the side door, so we could just open the door to get air in. We also said its more practival to have the vent in the shower to reduce moist and prevent mould building.
Step 1.1: Cut the Hole
We meassured the size of the hole we would need for the vent and cut the hole in the ceiling of our Van (while praying that we had meassured right :) ). We did this with our regular sew, but if you have a proper workshop please use more suitable tools.
Step 1.2: Fit your Vent
For this next step we used window sealant and covered all of the edges then we put the vent in the hole. Leave this to dry for at least 24 hours. IF you have a light in the Shower area make sure you have everything wired up.
Step 2: Start your Ceiling
Step 2.1: Choose the Right Material
The material you choose plays a vital role in both aesthetics and functionality. Here are some popular options:
1. Plywood: This is a common choice for campervan ceilings due to its balance of weight and strength. Lightweight and easy to work with, plywood can be painted or stained to match your van's interior.
2. Lining Boards: Lining boards offer a classic and stylish look, often made from pine or other softwoods. They provide excellent insulation and can also be easily painted or treated.
3. PVC Panels: If you’re looking for a waterproof option, PVC panels are ideal. They come in various colors and styles, are easy to clean, and require minimal maintenance.
Each material has its advantages, so consider your own style, budget, and how much insulation you need before making a decision.
Step 2.2: Put the Ceiling Together
Once you've chosen your material, it's time to put your ceiling together.
1. Measure and Plan: Start by measuring the ceiling space in your campervan. Plan where each board will go, making sure to leave space for lights and ventilation.
2. Cut the Boards: Based on your measurements, cut the lining boards to the appropriate lengths. We did this board by board, to be sure that we had the right meassurements.
3. Install Supporting Strips: Attach wooden strips or battens to the van's ceiling to provide support for your lining boards. Ensure they're level, as this will dictate the final look of your ceiling.
4. Attach the Lining Boards: Start from one end and work your way across, securing each board to the supporting strips with screws or adhesive. Additional to that we also srewed little metal plates onto the ceiling and srewed the board onto that.
5. Finishing Touches: Once all the boards are in place, if desired, paint or stain the wood for a polished look.
6. Add Fixtures: Finally, install any light fixtures or ventilation sources to finish your ceiling setup.
Tools:
Sew
Screw
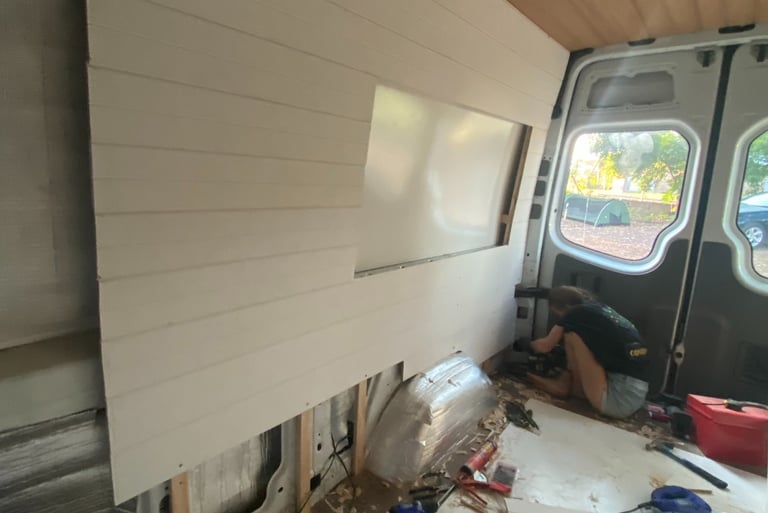
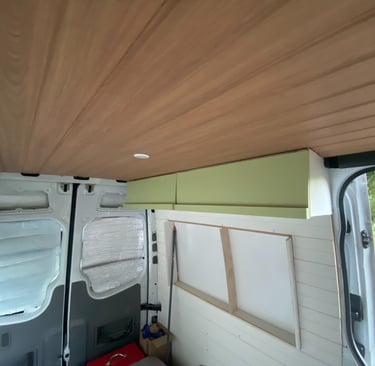
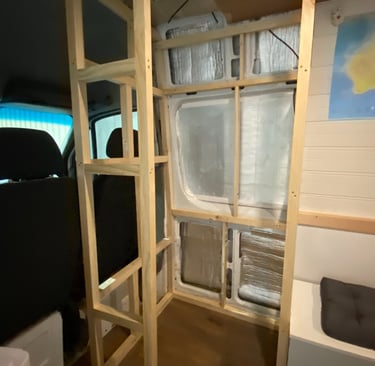
Step 5: Walls
Materials:
Panels
glue
screws
When you choose your type of material you want to use for your walls, there are some things to take into consideration.
Probably easiest way is to use the same material as your Ceiling. When you take that into consideration, please keep in mind that the materail then covers the whole of your Van interior. So if you take white boards keep in mind that your whole interior is gonne be white.
Popular choices:
Plywood
The advantange of Plywood is definetly the cheaper price, another good feature is the fact that Plywood is more bendable than other materials and it is easier to fit it onto the shape of your Van. Plywood is also easier to install, since you have big plates. After it is installed you can get crative by painting onto it. If you do so check beforehand if you need to prime it first.
MDF Wall Lining (primed or unprimed)
Medium Density Fibreboard has its pros and cons, lets have a look at it. The first big advantage is the fact that MDF is cheaper in price than solid wood panels. The fact that it is seen as a more enviromently friendly option compared to folid wood, since it is manufactured using recycled wood fibres, it reduces the need to cut down more trees, making it an environmentally friendly material. And lastly MDF is very easy to paint, so after installation there shouldnt be any bother with priming. On the other hand MDF tends to easily soak up water bringing it to expand way more easily than solid wood. MDF is also known to crack easier when too much weight placed on it. IF you decide to go with MDF we recommedn to have a good read through advantages and disadvantages before you buy something.
PVC Wall Lining Board
That was the option for which we went in the end. With our particular situation it probabley was the cheap price, the good and simple look and the easy was of installing. But if we have a more practical look at it, those are the advantages of PVC: As a really big advantage is the fact that they are mostly moisture resistance, easy in maintenance and easy to install. As a disadvantes is to keep in mind that they seem to have poor insulation.
Please note before you start with your Walls, make sure your insulation is done porperbly. Also be aware of any cables you will need later in the process for example for the water system or similar.
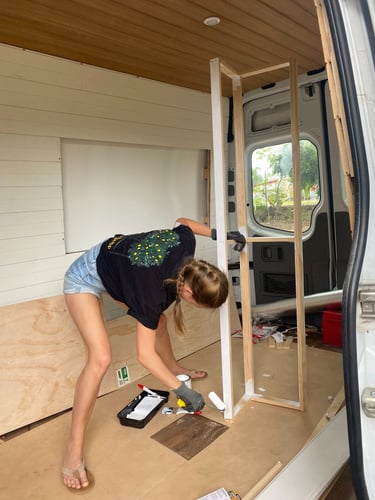
Step 1: Put your Framing in place.
For this we used 90x35mm Framing Untreated Pine. We screwed them onto the walls. Make sure you have those in regular spacing, so that you can srew your panels on evenly later. We screwed then from top to bottem and inbetween.
Step 2: Screw your Panels.
With this you start from the bottom and work your way up. At the sliding door side of the Van we needed to cut our boards in length to make it fit, on the other side we could simply screw em on. We also "Liquid Nail Heady Duty" glue with which we were really satisfied.
(ADDITIONAL) Step 3: Fix the Bump Ins.
We decided to keep the little Bump-Ins to get more room and be able to sleep sideways. But if that is too much hussle just lay your wall over it. We needed to cut our panels around the bump out and put a white plate in the bumpout, then we build a frame out of our wall liners and finished it up with some lining boards.

Tools:
drill
saw
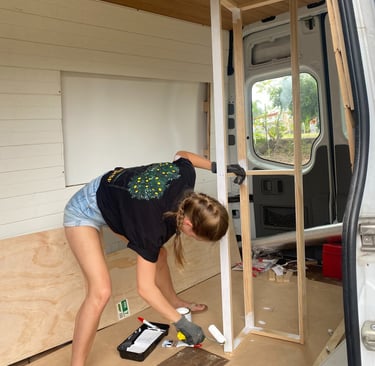
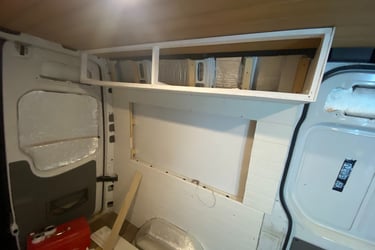
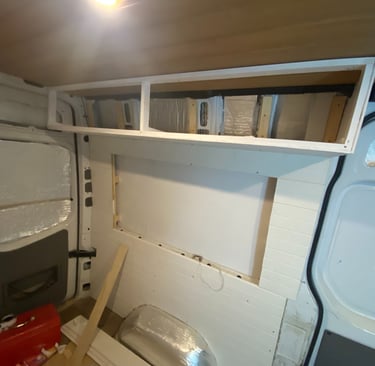
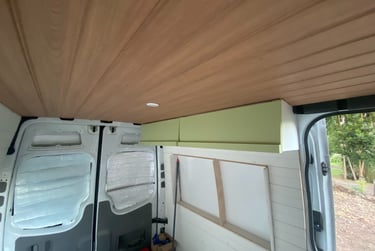
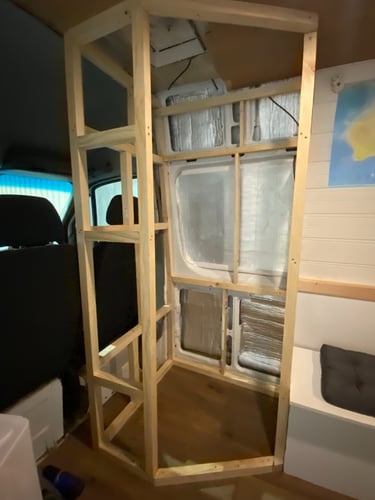
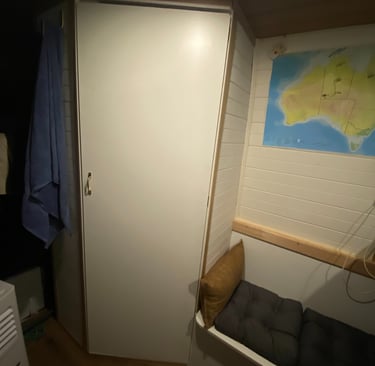
Step 6 Overhead cabinets
Materials:
Timber frame
screws
Plywood
paint + primer
hinge
Building a DIY Hanging Wall Cabinet for Your Campervan:
When it comes to maximizing space in your campervan, ingenuity is key. A well-constructed hanging wall cabinet can provide essential storage while adding a stylish touch to your mobile living space. In this step-by-step guide, we'll walk you through the process of building a DIY hanging wall cabinet for your campervan.
Step 1: Meassuring
The first step in building your wall cabinet is accurate measurement. Grab a measuring tape and consider where you want to install the cabinet. Measure the width, height, and depth you desire, taking special care to avoid any obstructions like windows, electrical outlets, or furniture. Remember, maximizing space while maintaining convenience is crucial. Write down your measurements to ensure precision during the building process.
Step 2: Build your frame
With your measurements in hand, it’s time to start building the cabinet frame. Using plywood, cut out the pieces for the top, bottom, and sides of the frame. Assemble these pieces using wood glue and screws for extra strength, forming a rectangular or square frame based on your design. We also directly painted the Frame white, since it was more accesiblee while not mounted to the wall. First Primer, then white.
Step 3: Screw your frame to the Wall
Once your frame is assembled, it’s time to mount it. Find the studs in your campervan walls using a stud finder—this is where you'll want to anchor your cabinet for stability. Use a drill to securely screw the frame into the studs, making sure it is level. If your frame has a significant depth, consider using wall brackets for added support. This will help ensure your cabinet can handle the weight of the items you plan to store.
Step 4: Put the Plywood as walls in
Next, it's time to add walls to your cabinet. Cut out plywood panels to fit between the sides of your frame, creating a closed storage unit. Ensure that your cuts are precise for a snug fit, and attach the panels using wood glue and screws. This will provide durability and a finished look to your cabinet. Depending on your design preference, you can keep the back open for easier access to the wall (in case you still need some wires or siilar or just to save yourself some work) or fully enclose it.
Step 5: Add Hinges to screw doors
After the walls are in place, it’s time to create the cabinet doors. Measure the openings on the front of your cabinet frame and cut out two plywood pieces accordingly. Attach hinges to the sides of the doors, ensuring they align properly for smooth operation. Positioning the hinges correctly is critical for ease of use, so take your time during this step. Once the hinges are attached, fix the other side to the cabinet structure using screws.
Step 6: Put Primer on it
With the frame and doors ready, it’s essential to prepare the surfaces for painting. Apply a primer to the entire cabinet, as this will help the paint adhere better and provide a more even finish. Primer is especially important in a campervan environment, as it offers protection against moisture and can help prevent warping. Allow the primer to dry completely according to the manufacturer’s instructions before proceeding.
Step 7: Paint it with a color of your choice
Paint It with a Color of Your Choice Finally, it’s time to add color to your finished cabinet! Choose a paint that suits your interior design and personality—be bold or subtle! Apply the paint evenly using a brush or roller, and allow it to dry thoroughly before adding a second coat if necessary. Painting not only enhances the aesthetic appeal of your cabinet but also protects the wood from wear and tear over time.
Step 8: Add a Handle to open and close the cabinet
We went with simple black handles which were simply screwed onto the cubboard. Make sure your screws have the right length, if they are too short they are not holding, if they are too long they go through the wood.
Step 9: Add any accesories
This is additionial, if you want add magnets which we higly recommedn to keep the cabinet closed while driving, we also build in little arms to make the cabinet staying open.
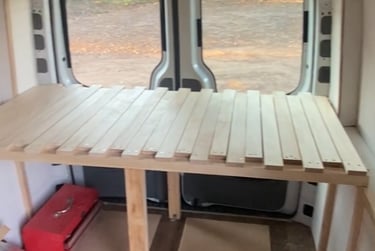
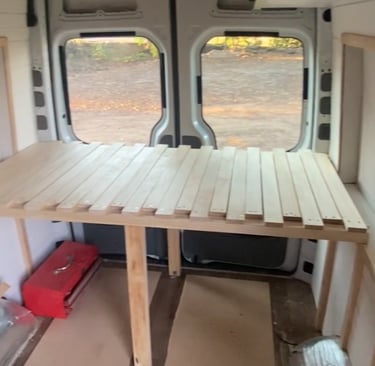
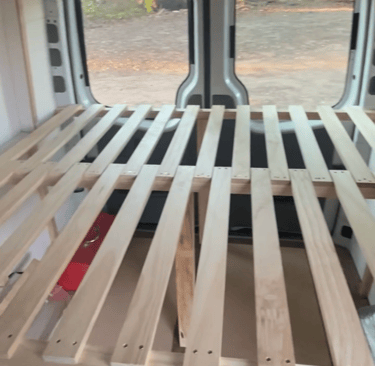
Step 7 Bed (Bedframe)
Since we settled on a Medium wheelbase we needed to be very cautious with what we do with space. Since din´t want to cut out on a shower we settled on a slide out bed which gives us more space.
The fixed part of our bed is only 80cm and the slide out part comes to another 80cm. That gives us a total of 1.60m of bed, this is a lot and we probably woudlnt need that much but we settled on 80cm each simply because of matresse sices you can get. 80 or 90cm are pretty common, every thing smaller you would need to customize, since we were building in it a remote region, we were trying to avoid shipment deliverys.
Materials needed:
Timber screws
Framing Timber
screwdriver
drill
Step 1: Build your frame
Make sure you have some framing timber or similar attached to the walls so that you can screw your bed frame to the wall. Also make sure that you get the right length of srews otherwise you srew through your Van Wall.
Since we opted for a slide out bed our frame was (once understood) easy to assemble.
First we installed the legs of the bed, we put four one on each corner, one in the center and one inbetween the door for extra stability. We scred and clued them to the floor and to the walls. Then we put some more framing wood vertically on top of the legs.
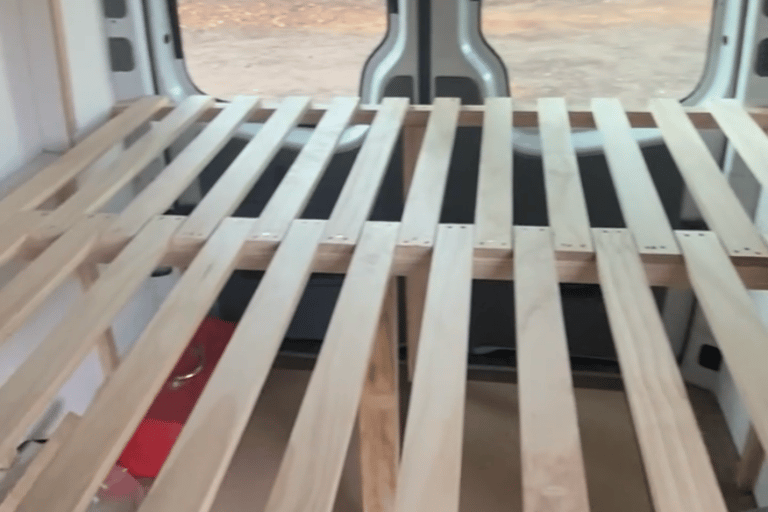
Step 2: Build the Slatted Frame
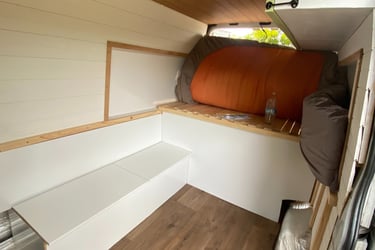
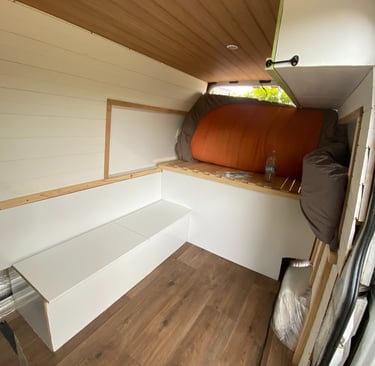
Step 8: Seating bench
Create Your Perfect Space Transforming a campervan into a cozy living space involves careful planning and creative solutions. One essential feature in making a van functional and inviting is a well-designed seating bench. Not only does it provide a comfortable spot for meals and relaxation, but it can also serve as valuable storage. In this blog post, we’ll walk you through the steps to build your own DIY seating bench for your campervan. Follow these simple instructions to create a multi-functional area that enhances your adventures on the road.
Materials:
Framing Wood
Seating bench
screws
cushions
Step 1: Take Meassurements
Before diving into the building process, it’s important to take accurate measurements. Start by assessing the available space in your campervan. Measure the width and length of the area where you plan to install the bench. Consider how many people you want to accommodate and ensure there’s enough room for foot traffic. Having a tape measure handy will make this process easier and help prevent misalignments in the future. Take notes and sketch out a rough design to visualize how the seating bench will fit into your campervan.
Step 2: Build a Frame and mount it to floor and wall
With your measurements in hand, it’s time to construct the frame. Using sturdy wood, build a rectangular frame to serve as the base for the bench. This will provide structural support, so it’s crucial to ensure it’s robust enough to withstand weight and daily use. The dimensions of the frame should correspond to your measurements from Step 1. Once the frame is constructed, secure it to both the floor and the wall of the campervan using appropriate brackets or screws. Attaching the frame to both surfaces increases stability and safety. Make sure it’s level, as this will affect the final look and comfort of the seating area.
Step 3: Put Plywood as walls
Next, it’s time to add sides to your bench. Cut plywood panels to match the height and width of your frame. These panels will serve as the walls of your bench, enclosing the space underneath for storage. Attach the plywood securely to the frame using wood glue or screws. This is where you can get creative – consider painting the panels or adding functional elements, like cup holders, to enhance your bench's usability.
Step 4: Add a Seating Bench on Top + Hinges for Easy Access Now comes the most enjoyable part – constructing the actual seating area! Cut a piece of plywood to fit the top of the frame, ensuring it’s aligned perfectly to make a comfortable seat. To make your bench more functional, we recommend adding hinges. Install these along the back edge of the seating plywood, allowing it to lift up easily for access to the storage area beneath. With this setup, you can conveniently store items such as batteries or other smaller essentials. Consider adding a soft cushion or a layer of foam on top of the plywood for extra comfort when sitting or lounging. Depending on your style preference, you might also want to cover it with fabric to match your campervan’s interior.
Step 5: decorate it with some pillows
Once your seating bench is built and in place, it’s time to bring it to life with some decoration. Pillows not only make the area more inviting, but they can also enhance the comfort level significantly. Opt for colorful or patterned pillows that complement the overall decor of your campervan, creating a warm and welcoming atmosphere. A few throw blankets can also add an element of coziness, perfect for those chillier nights. This seating area isn’t just for mealtime; it doubles as a perfect spot for relaxing, reading, or enjoying a cup of coffee while soaking up the scenery.
Conclusion Building a DIY seating bench for your campervan is an excellent project that adds both functionality and comfort to your space. With its robust structure, ample storage, and cozy seating area, it’s the perfect addition for any road trip enthusiast. Remember to personalize it according to your style and needs, ensuring it reflects your unique taste. Now that you have your seating bench completed, get ready to hit the road in comfort and style, making unforgettable memories along the way!
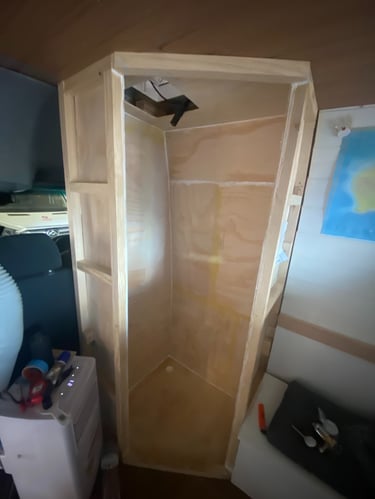
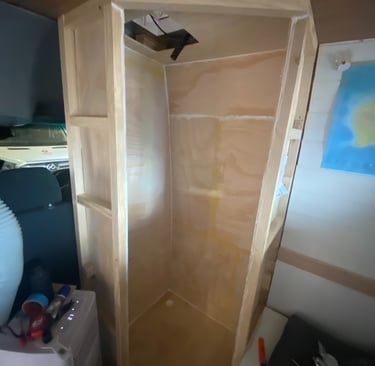
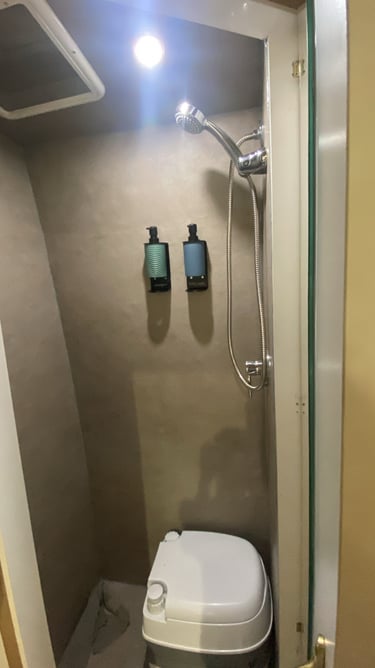
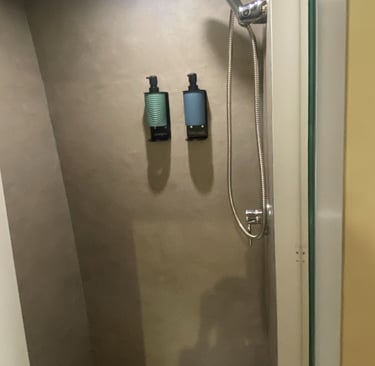
Step 9: Shower
Building a shower frame for your van adds functionality and comfort to your mobile living space. Here’s a step-by-step guide to constructing a corner shower suitable for one person, ensuring your project is both practical and efficient.
Material:
Timber frame
screws
glue
membrane
primer
brush
vinyl sheets
plywood
tube + fittings
shower head + amature
silicone
roof vent
drill
drain
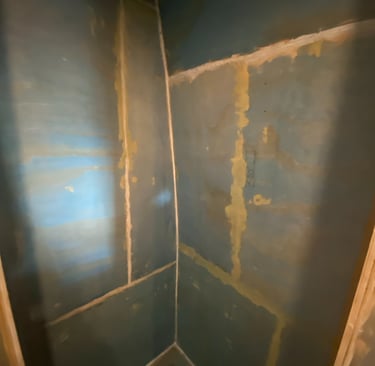
Step 1: Build your Shower frame
The ideal dimensions (for us and our Van) for a corner shower designed for one person are approximately 1.80 meters in height and about 79 centimeters at the widest point. Make sure to account for the specific area in your van where the shower will be placed, ensuring it optimally utilizes the corner space without obstructing other parts of the van.
Step 2: Cut your drain hole
Next, you’ll need to cut a drain hole in the shower base. This is crucial to ensure proper drainage after use. Make sure the hole is appropriately sized and positioned to connect with your drainage system effectively.
Step 3: Cover the frame with Plywood
we used 7mm
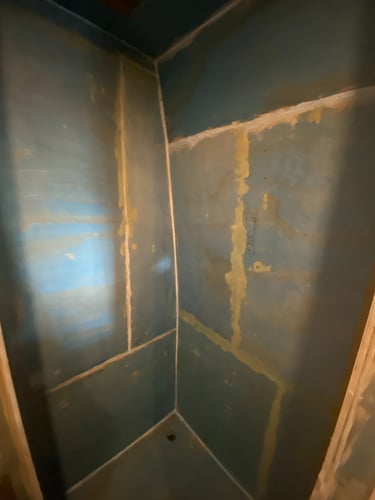
Step 4: Fill all holes with woodfiller
After the plywood is in place, take the time to fill any holes or imperfections in the wood with wood filler. This step is vital for a successful waterproofing process. Once the filler is dry, sand the surface thoroughly to eliminate bumps and ensure a smooth finish. Any inconsistencies could jeopardize the waterproofing membrane's effectiveness.
Step 5: Apply Primer
To prepare the wood for waterproofing, apply a primer. It’s best to apply two coats to ensure a solid foundation. This will help the waterproofing membrane adhere better and provide additional protection against moisture
Step 6: Install the Membrane
Following the primer, it’s time to apply the waterproofing membrane. Make sure to follow the manufacturer’s instructions and apply at least two coats for maximum effectiveness. Allow the membrane to cure completely before proceeding to the next steps.
Step 7: Add Shower Head and Accessories** With the frame waterproofed, it’s time to install the shower head and other necessary equipment. This includes the starting tubes and fittings. Make sure to choose high-quality materials that are designed for wet environments to ensure longevity and usability.
Step 8 Add Additional Lighting** Consider installing additional lighting in your shower area. A well-lit space can enhance functionality and safety. Choose waterproof lighting fixtures designed for use in showers to prevent electrical hazards. This step is additional, you can do it or not.
Step 9: Choose Your Wall Finish** Next, decide on the wall finish for your shower. Popular choices include vinyl sheets, tiles, or even some waterproof paint. Each option comes with its own aesthetic benefits and maintenance considerations, so choose according to your preference and how you plan to use the space.
Step 10: Apply Silicone Sealant** Once your walls are installed, use silicone sealant to ensure all joints and areas around fixtures are properly sealed. This step is crucial in preventing leaks and maintaining the integrity of your shower area. Make sure to allow the sealant to cure completely according to the manufacturer’s instructions.
Step 11: Cover the Outside of the Frame** To maintain a cohesive look in your van, cover the outside of the shower frame with materials that match the rest of the van's walls. This not only enhances aesthetics but also provides additional sturdiness to the frame.
Step 12: Install the Door
Finally, it’s time to install the shower door. Choose a door that fits your design and space requirements. Make sure it opens and closes smoothly to provide easy access to your shower while ensuring minimal water leakage. With these steps followed carefully, you can successfully build a functional and aesthetically pleasing shower frame in your van, ensuring a comfortable and convenient bathing experience on the road.
Step 10: Install your water system and your gas system
For those two, it is highly suggested to hire a professional. I will not go into detail with either of those systems as I am not fully qualified to write about installing them.
Gas System:
Our gas system was the easier one of the two. We decided to go with the usual gas bottles, which we only use for the stove.
When you choose a cooking stove, one of the main factors is if you want your stove to be powered by gas or electricity.
When you decide to install the gas bottle yourself, there are a few safety tips to be aware of.
The following list includes just a few of the many things you will need to be aware of.
Different styles to install a gas bottle:
Install a separate compartment where you store the bottle
Gas always sinks to the bottom, so have it somewhere lower
Make sure the bottle is in a sealed gas box that can only be accessed from the outside (Australian standard)
Water system:
I will not go into all of the plumbing aspects of laying your pipes and connecting your water tanks, etc.
Materials you will need:
Water pump
Water heater
Arms
Elbows
Water pipe
Grey & fresh water tank
When you purchase your grey and fresh water tanks, you'll need to think about your consumption level. How many people will be in the van? Are you planning to go off-grid for a while? Where will you be positioning your tanks? How big can they realistically be to still fit?
You will need water in your shower if you decide you want one, and you will need water in your kitchen.
Regarding heating solutions, you can either use gas or electricity. Realistically, you need hot water in the shower and in the kitchen. When we first started, we used a gas heater, but after a few trips, we decided we wanted to install the electrical water heater. Yes, this is on the more expensive side, but we had the experience that with the electrical water heater, you have constant hot water, instead of a bulk of hot water and then while the next load is being heated, you are stuck with cold water. Also, the temperature control is more efficient with an electrical one. If you decide you want an electrical heater, you either need to have sufficient battery power, or you only use it when you are plugged in.
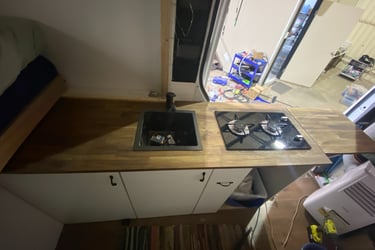
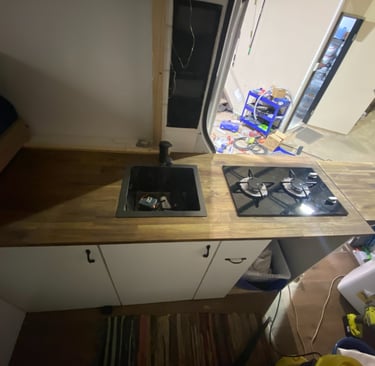
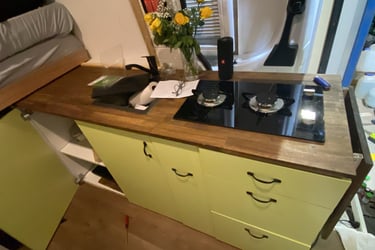
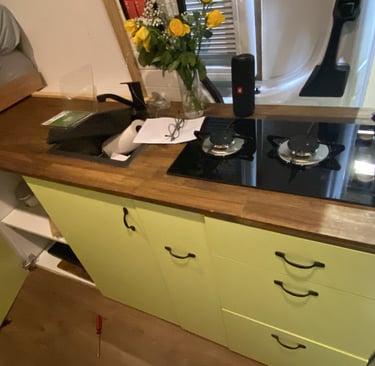
Step 11: Build your Kitchen
When you start working on your kitchen there are a few things you need to think of.
What height should your kitchen be?
What size and kind of sink do you want?
Do you want any power outlets in your kitchen? If so, where?
Do you want drawers or cabinets or both?
What kind of stove do you need? Here you also need to finalize your decision if you want an electric or gas stove.
What materials do you want to use?
We decided we want a bigger kitchen, we went with 80cm heights and 1.50m fixed length. We could get that length, because we decided to build about thirty centimeter infront of the sliding door. Then we also installed an extra piece which you can fold out and store away after use. We went with two big cabinets with each two compartments, one smaller spice rack which slides out, and two drawers.
Materials:
Framing wood
Shelving
Screws
Glue
Drawer slides
Drawer doors
Sink
Stove
1. Build the frame: Measure everything carefully, then cut and screw the frame together.
2. Add the walls/panels: Attach the side and back panels to form the cabinet structure.
3. Place the countertop: Set the kitchen top in position and make sure it’s level.
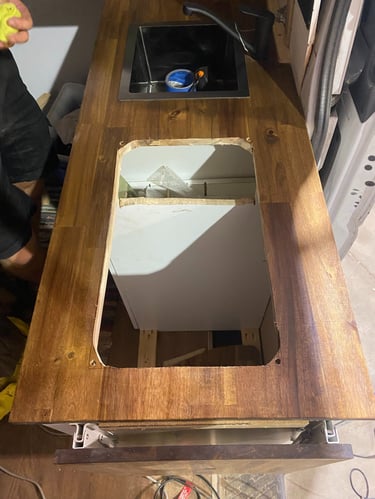
4. Cut openings: Mark and cut out space for the sink and stove (follow the templates if included).
5. Build drawers and shelves: Assemble drawer boxes and install cabinet shelves.
6. Add a fold-away end board (optional): Attach a board to the end of the kitchen with foldable support arms/brackets so it can extend the surface when needed and fold away when not in use.
7. Add hardware: Attach door/drawer handles (and hinges if needed).
8. Finish (optional): Paint or seal the cabinet fronts if required, then let everything fully dry.

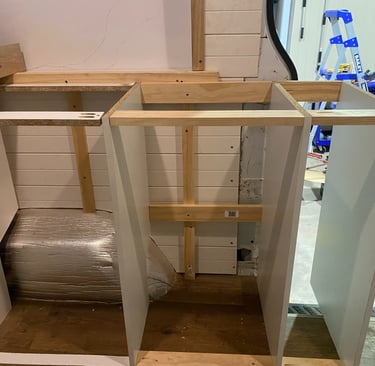


Kitchen Frame + side walls
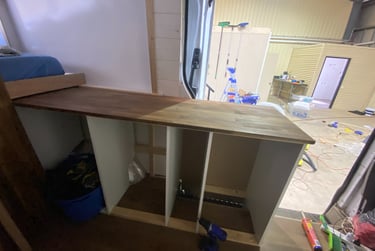
Kitchen base with cooktop
Almost finished Kitchen
countertop with cutouts
Step 12: Install your Power Inlet and finish up your battery system
1. Choose a suitable location to install the power inlet on your motorhome, ensuring it's easily accessible and away from any potential water ingress. Usually it is situated at the side of the vehicle over the wheel.
2. Use a drill to create a hole for the power inlet, ensuring that the hole is appropriately sized according to the specifications of your inlet.
3. Insert the power inlet into the hole and secure it in place using screws or clamps as recommended by the manufacturer's instructions.
4. Connect the wiring from the power inlet to your battery system, following the color codes for positive and negative connections.
5. Ensure all connections are tight and insulated to prevent any short circuits.
6. Close up the inlet cover and secure it properly. We also siliconed the outside of the cover to make sure its watertight.
7. Once everything is installed, double-check your connections and power on your battery system to ensure everything is functioning correctly.
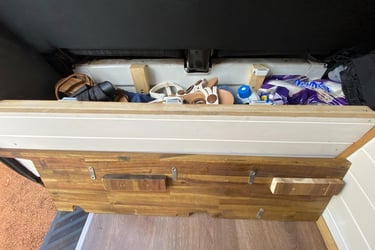
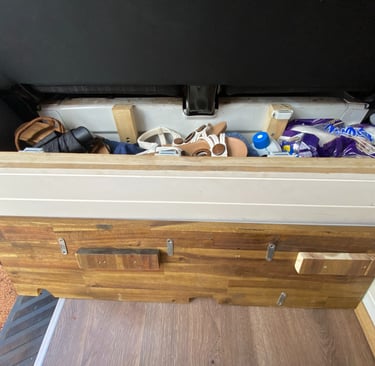
Step 13: Build a storage box behind the passenger seat
When we decided we need more storage room in our van and had a look aorund for suitable location, the space behind the passenger seat and the beginning of the door frame, was a prefect place for a small storage. We decided this would become our new shoe box.
Length: from the one side of the wall (where the sliding door is) to the beginning of the shower. And then we could even fit a broome by sliding it into.
Step 1:
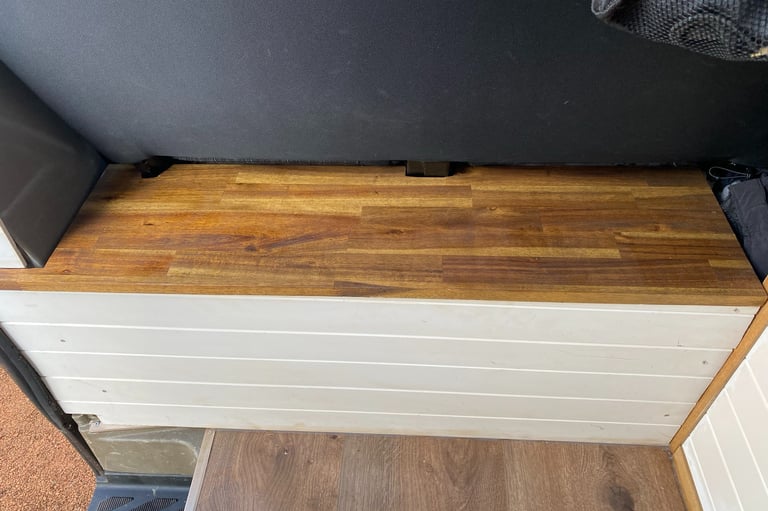
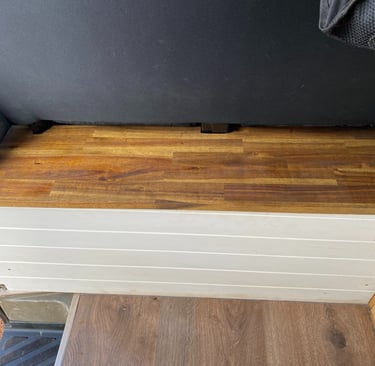
Meassure the length of the box you have. We used the same lining boards we used fot the walls, since we had some leftvover and it gave the van a nice touch.
Step 2: Build you frame
This frame was much simpler than the rest of the vans framing. On the fron tof the box we put three framing woods verticl and two horizontal. one horizontal screwed directly to the floor, th other one on top to the metal of the underpart o the seat.
Step 3: Build the Wall
This was really easy, we took out meassured lining and screwed it to the framing board.
Step 4: Build a cover
We decided for our cover we will use the rest of our kitchen benchtop. Cut out the desired seize and secure it with magnets to the top of the box and back of the seat.
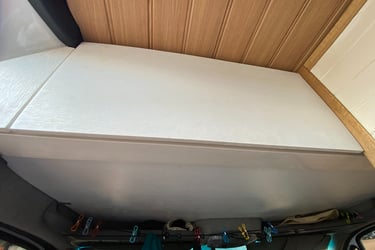
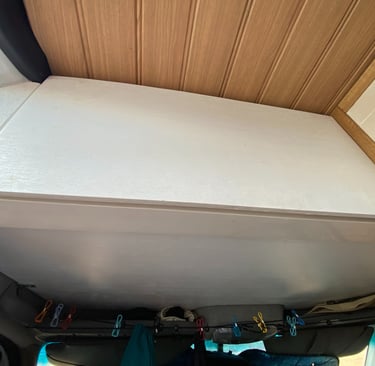
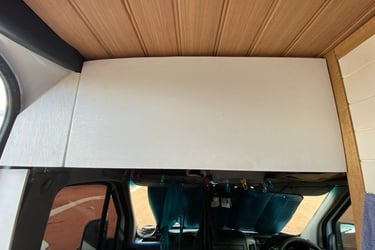
Step 14 Overhead storage compartment over driver & Passenger seat
This part of the Vanbuild was reall nervewrecking, but only because it might have been smarter to build this, before we had build the shower. But as a lot in this van this was kind of a impulsive decision, when we realizes that we want again mor storage room. (Haha)
So we decided that space above our heads was just a waste of space and could be so much more. So off we went back to Bunnings...
Step 1: Getting your meassurements
We meassured the length from passenger door to driver door and the width from where the shower wall began to the front van wall.
Step 2: Cut your template
We used a relatevely thin plywood, since we were not planning to stack heavy things in the new compartment. we cut out a paper template first and tested if it would fit, before we cut out our actual plywood.
Step3: Sandpaper and painting
We then sandpapered the Plywood and painted it in white. This step is optional.
Step 4: Fit your plywood (Thats where it got painful..)
Squeezing this into the space in the driver cabinet was a pain, this step might be easier if you dont have your shower already in place limiting access.
Step 5: Screw the plywood
While one person was holding th eplywood in place, the other scewed it in place using hooks. one on each side. we screwed it just on top of the Grey Roof Ceiling Grab Handle.
Step 6: Add a door
We thought about a sliding door or a door which open and closes. We went with the open close door since we did not find the right materials for a sliding one. Take your meassurements and cut your template. We also decided to paint the door. Fix the door with two hinges.
Step 7: Add magnets for hold
Since we are driving and we did not want stuff to fall out we installed two extra magnets to support the door beeing closed.
Step 8: Add accesories
If you wish you can add a door handle, or like we did, we added a little piece of wood outside the cabinet to make it look nicer. (See picture for reference)

Conclusion:
As this is our first Vanbuild we are really proud of what we schieved. With a little planning and preparation ou dont need to be a tradie of sorts to do this yourself. If you dont have certain skills, there is always a way of learning. We still highly recomend having a professional looking at the gas/electrical and plumbing part of the build but except for that, if you are up for a chanllenge and always wanted to build your own Van, this is the thing for you.
Fore more information followus in instagram, where we have documented our vanbuild through Videos.
© 2025. All rights reserved.
Questions, Comments? Let us know!
Follow us and stay updated!